Thursday, June 23, 2016

Craft "Room"


Before we moved to our new home, we had redone this little closet in our previous house as a designated office/craft space. I LOVED it, but it had it's limitations. Namely, space. I had to be careful on what and how much I purchased when it came to craft supplies (first world problems). It was also quite difficult to locate specific items because everything was pretty jumbled together.

When we moved, I hoped to have a designated craft space eventually. When we redid our office, we didn't really install much in the way of storage. Plus, since it's one of the first rooms you see when you walk into our home, I didn't really want people to instantly have a view of my craft supplies strewn about.

So, everything was just crammed into the closet without much in the way of organization. It got out of control fast...


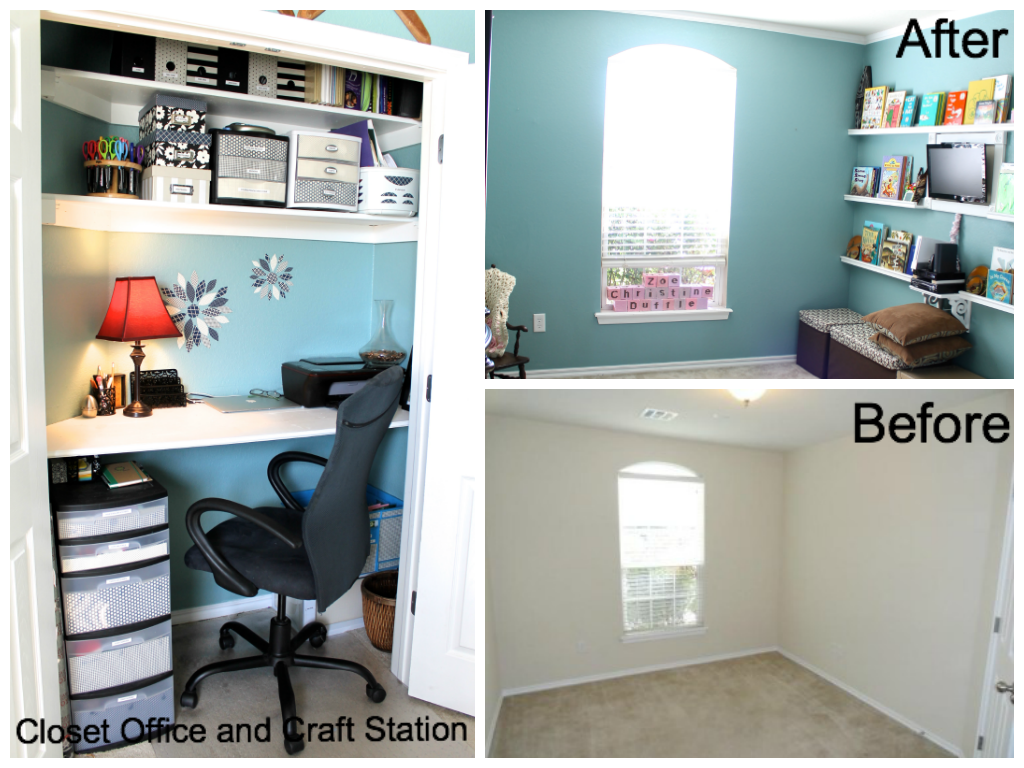
So a few months ago, I finally talked the handy hubby into helping me with a few "honey do's." He built a few shelves, hung a few pegboards, and the result is amazing. Sure, it's in the back of a closet so it's a little dark and space is still tight, but everything has a place now. I freshened it with a bit of paint, some peel and stick flooring, shelf paper, and buckets. Check it out...
The existing shelves in the closet were kept and utilized as storage for supplies. Peel and stick flooring was installed for easy mess clean-up.

We found a good spot for the mail and file cabinet, installed pegboard, and a chalk board for fun.

Painted pegboard, hooks, and mini buckets from target helped to organize supplies like ribbon, markers, and tulle.

An additional pegboard was installed to hold wrapping paper. The handy hubby made a paper organizer, and buckets were hung from the clothing racks to hold items like glue and popsicle sticks. 

The supports were kept from a previous shelf, and a different board was inserted as a desktop workspace.

Baby food jar lids were screwed to the underside of the shelf to hold knick knack items like paperclips and rubber bands.


Monday, May 30, 2016

The Weekend Pergola


Our weekend pergola project may be one of my favorite projects to date (of course I say that every time.) So here's the details...(scroll to the end for final pictures)

This was our backyard before:


Our backyard faced the setting sun. See that big table the hubby built? Yeah, love eating at it, but we never get to enjoy it because Oklahoma is HOT ya'll...


So we decided that a pergola was the most cost-effective solution. We would extend a pergola off the back of the house out to the end of the patio slab. Then we would add shades to the ends that pull down and block the sun.

So here is what we used (pretty much everything purchased at Lowes):

  • 2 8x6ft sun shades
  • stain and sanding materials
  • Quarter Round and trim (for edging the top and bottom of the post boxes)
  • String Lights
  • Bolts and washers
  • Screws
  • Nails and Trim Nailer
  • 7, 2x4x8's
  • 3 4x4x8's
  • 4 2x6x12's
  • 3 2x6x8's

I started with staining the wood before it was put up, which I highly recommend. It made things soooo much easier. I love the Canyon Brown color by Olympic Stain.

We basically started with the 3 main posts. We drilled brackets into the concrete slab, placed posts, leveled, and screwed in. Then we did 2 of the 2x6x12's across the top. We placed the cross posts and pocket screwed them to the house roof. Then we installed the shades. Followed by putting up the remaining 2x6x12's on the other side (so the blinds were sandwiched and not visible when rolled up). Finally, we finished up with some trim work.

Add a cute outdoor rug from Target, and some string lights from Lowes (along with re-staining the table to a matching color), and voila! Finished Product. All around $550 or so, and done in one 3-day weekend! :-)
Here is the final Product:
Inside with Screens Down:

Outside with Screens Down:

Inside with Screens Up:

Outside with Screens Up:


Thursday, April 28, 2016

Farmhouse Kitchen Table

Here's the deal, our "eat in" kitchen space is limited. I have a giant table in the dining room, but when
it's just the 3 of us, it just seems like too much work to eat in there. For the past year, we have been eating on a wooden folding table in our kitchen while we decided what sort of table we wanted to build. As you already know, I hate spending crazy amounts of money on furniture, so building was definitely the way to go...

Many years ago, before we met, my hubby came across a large turnbuckle left on his property, presumably left there by an oil company from the past. He thought it was neat, so he dragged it back to his mom's house and stashed it away. Fast forward, and my mother-in-law held onto it all these years and recently came across it again while going through her shed. We decided it would make the perfect centerpiece for our "industrial farm house" table.


The table is  mostly made from cedar planks, sanded to oblivion.

Lowe's no longer carries my favorite stain (boo!) so I had no choice but to go with the only one available in stores. I really dislike Minwax products, but I have to say that I do love this color (Bombay Mahogany). I'm currently looking for a replacement, however, because this doesn't go on as smooth as I need it too.

We added some piping to hold the turnbuckle in place. I love the industrial element it adds to the table!


 Finally, we paired the table with these great chairs we ordered from Amazon. I love them!!


Here is the final product!