Vintage Wonderland Unbirthday Tea to celebrate Z turning 3! I loved this theme and it was perfect for a 3 year old little girl. I wanted it to be girly and fun with some sophisticated garden touches. It was a big hit, and turned out beautiful. Here's what I did:
 Invitations:
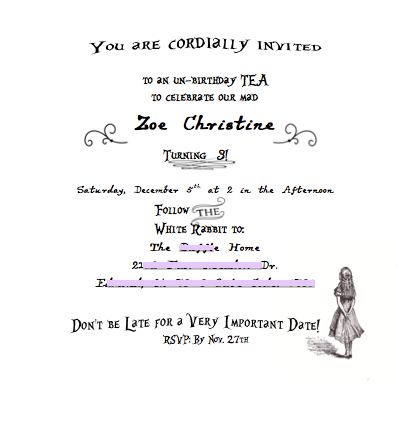
First things, first...the invitation to the party! I was so happy with these "message in a bottle" invitations." See the full invitation details here: Vintage Wonderland Un-Birthday Tea : The Invitation
Menu:
I wanted a (mostly) traditional tea menu for the party. I wanted it to be something of a light lunch. I stuck with traditional items like tea sandwiches and deviled eggs. I pre-portioned the food as much as possible to make it easier to grab in a buffet-style set up.
 Here is what was served:
Mad Hatter Menu
Eat Me:
Tweedle Egg
(Deviled Eggs)
B
White Rabbit Veggies
(Assorted Vegetables with
Ranch)
B
Dormouse Cheese
(Assorted Cheese, Meats, Nuts,
and Olives)
B
Bread and Butterflies
(Assorted Tea Sandwiches)
B
Cheshire Chocolate
(Chocolate Fondue with
Assorted dippers)
B
The Queen’s Toast
(Un-Birthday Cake)
Drink Me:
Flamingo Water
(Spa Water with Fresh Fruit)
B
Caterpillar Tea
(Sweet Tea with Lemon)
(Sweet Tea with Lemon)
I made the menu's using the kraft paper luggage tags you can find at most craft stores, and some gold paper. I tied them with some twine. I placed this menu in with each gold silverware set. I folded the napkins using this tutorial. It allowed for the cutlery to be an easy grab, along with a spot for the menu's. I placed these in a wicker basket next to the plates on a separate table as pictured.
P.S. the cutlery and plates came from Target. LOVE!
Decorations:

"Room Decorations": My daughter is obsessed with balloons so we HAD to have as many as possible. I purchased a helium tank from the party section of Walmart, and several bags of gold balloons. They hovered over the table tied with curly gold ribbon. I bought these floral fans. I also used some black one's I purchased from Hobby Lobby awhile ago. I hung them around the room and in the large dining room window. I purchased a glittery "Happy Birthday" banner from Hobby Lobby, along with the wobbly clock, and hung them on the wall with command
 hooks. Finally, my husband built an A-frame sidewalk chalkboard sign a few weeks ago for a photo session, so I re-used it for the front to help "direct" our guests.
 hooks. Finally, my husband built an A-frame sidewalk chalkboard sign a few weeks ago for a photo session, so I re-used it for the front to help "direct" our guests.
  "Table Top Decor": I used the main dining table, a wooden "card table," and our island for all the
  food, drinks, and desserts. I covered each with some chalkboard wrapping paper to protect the surface. I was originally going to write on it, but thought decided it really didn't need any more "clutter" so I left it blank. I spray painted several food cans and a few liquor bottles gold, and filled them with fake flowers and little chalkboard signs that I wrote things like "eat me" or "drink me" on. I put these all around the room and on the food surfaces as center pieces and decoration. I also collected some pine cones a few weeks ago that I spray painted gold and placed around the room. They held the playing cards well, which helped tie it in to Alice in Wonderland. I put them on beds of fake moss purchased from dollar tree to "green things up." I purchased two little chalkboard signs that I wrote some sayings from the book on. Finally, I made little food tags for each item using an avery product purchased from the craft store, and I tied them with twine.
Food/Recipes:

"Tweedle Egg": Simple deviled eggs. I kept them simple and kept out the relish. I used mayo, mustard, butter, and salt. Then I piped them into the eggs using a ziplock bag. Also, if you don't have an egg-cooker, everyone needs one. Such a life-saver when it comes to getting hard boiled eggs perfectly cooked (and easy to peel!).


"Dormouse Cheese": We used a basket for the crackers and a cheese plate for an assortment of cheese and meat. We just picked two of our favorite blocks from the local grocery and pre-cut everything to make it easy to grab. I actually meant to label the cheese plate with the description of each item, but forgot!
 |
| 1 & 2 |
 |
| 3 |
 |
| 4 |
Helpful tips- whipped butter and whipped cream cheese spread so much easier for sandwiches. Also, thin sliced bread helps keep everything in proportion. Too much bread takes away from the flavor!

"Cheshire Chocolate": I used this Pinterest Recipe in my fondue pot. I cut up green apples, grapes, and strawberries. It was SO GOOD! I included little mini forks so everyone didn't need to keep up with their own skewer.

"The Queen's Toast": The birthday cake was the best part. My husband build a topsy-turvy cake stand very similar to this Pinterest tutorial. I used white cake mix and whipped butter cream frosting. I
decorated with strawberries, blackberries, and cranberries. I also bought some organic flowers at the specialty grocery store (and cleaned them REALLY well). I added the flowers just before the party to make sure they didn't wilt, as they only live on a cake like this for 12 hours or so.

"Caterpillar Tea": Simply a jug of sweet tea poured over ice in a glass pitcher. My daughter didn't care for it, but all the adults loved it! And you have to have tea at a tea party, right?!
Gifts:
 This year I wanted everyone to have a little something to take home with them. I found really cute gold foil gift bags, and filled them with Milano cookies, a deck of cards (purchased at dollar tree 2 for $1), and some Rolo's (because they are wrapped in gold).
I also had "party hats" for everyone to wear. I purchased little snowman hats from the Christmas section of Hobby lobby that are made out of felt. They look like little top hats and already had a red ribbon on them. I took stretchy gold string and stapled them to the hat to make a chin strap.
Outfit/Clothes:

I wanted to create and outfit for Z that embodied the theme of her party. I didn't want her to look exactly like Alice in Wonderland,
 but rather a steam-punk sparkly version that looked like she belonged at a Mad Hatter Tea. I purchased this dress, and these stockings. The dress was SUPER short, so I made a tutu with gold tulle. I created a head band from one of the top hats, a flower, and some feathers. It turned out perfect!
That is pretty much the party in a nutshell. There were too many details and elements to list every little thing! I'd love to hear your comments, so feel free to leave one! <3
-CD