Thursday, November 19, 2015

The Solution for Keeping Toddlers in Bed

I've heard it happening time and time again. You make the switch to a toddler bed because your little one is climbing out of their crib. Everything goes fine at first, but then they start to test the waters...they start getting out of bed. Once, twice... Over and over and over. After a few weeks/months you're pulling your hair out! How do you keep your child from roaming the house at all hours of the night?!

We came up with a solution that worked like a charm for us. We have had it for almost a month now, and our daughter has yet to get out of bed at night. Not even once. Meet my new best friend, the door alarm:

These can be purchased anywhere. Amazon has similar ones for around $5. See them here. What does it do? It attaches to the door (simple install...no screws!) and can be switched from off to chime or alarm (we have it on chime now that she understands we will switch it to alarm if she gets up). When the door is opened, it emits an alarm or chime sound. The alarm is a continuous sound that does not stop until it is either switched off manually or the door is closed. The alarm feature is particularly effective because it is so loud and obnoxious. Your child will WANT to make it stop, and will promptly shut the door.

I'm sure at some point she will figure out that she need only step out of the room and close the door behind her to make the sound stop. But for now, she doesn't even test it because she despises the noise so much. She will stand at the door and call for me if she needs me. It puts my mind at ease to know she won't be roaming the house while I'm snoozing away in the other room. It's also much more safe than a baby gate or lock because she CAN leave the room in the event of an emergency (such as fire). It has also been effective in keeping her contained during time out's. Pretty nifty solution for $5!


Monday, November 2, 2015

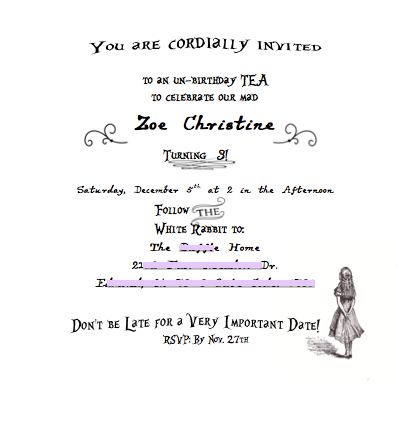
Vintage Wonderland Un-Birthday Tea : The Invitation


We are having an un-birthday tea to celebrate Zoe turning three! The un-birthday tea will be a nod to vintage Alice in Wonderland, with lots of garden party touches. As always, I wanted the invitation to reflect the party theme, and I think it hits the nail on the head.


Parcel boxes were purchased at the craft store and stamped with a tea pot. I then free-handed "Open Me" in the bottom corner with a navy pen that matched the ink pad. The box was tied closed with twine.


The interior of the box was lined with artificial moss purchased in the floral section of the craft store.


The small cork bottles were purchased at the craft store in sets of 6. A company called "Small Parts" makes the miniature magnifying glasses, which I caught on sale for 1/2 off. I tied a tag around the bottle, and free handed "Read Me" with chalk marker. The magnifying glass is tied to the bottle using twine.


The invitation itself is made from pink and gold scrapbook paper. The front side of the paper is actually white, but I watercolored it pink before printing. It was rolled using a chopstick to help get a tight roll, then tied with a piece of twine. The twine was left a bit long, so that a piece of it could peek out through the top (from under the cork), which makes it much easier to remove the invitation from the bottle.


Wednesday, September 9, 2015

Choosing Paint

So let's have a little chat about paint...

Paint is one of the absolute easiest and least expensive ways to transform a room. It can make all the difference in going from blah to wow. I have painted my fair share of spaces, and boy have I made some crazy color choices! (baby-poo green, anyone?).

So here's the deal. When it comes to your home, you want to love it 5 years from now, right? You want to be able to get a different couch or a different rug (or whatever) in a year, without worrying that it clashes terribly with your lemon meringue walls. You need to be able to resell your house without worrying about hiring a painter because you chose a different color for every single room of your house. So here are a few of my favorite painting tips for choosing the perfect color. I should tell you that these are 100% my opinion, but they have worked very well for us when it comes to resale!


1. Neutral, Neutral, Neutral! When it come's to the walls of your home, there's black, white, and brown (and all the shades in-between). That's it. Anything with a tint of anything else isn't a neutral and *probably* shouldn't go on your wall. Sure, there are those rare occasions where I'll paint a laundry room blue or something, but that's the extent of it, and really it would be better if I didn't. I love color, don't get me wrong, but orange should be on your pillows and rugs, not on your walls.


2. Pick a color palette and STICK TO IT! I'm totally guilty, and I know a lot of people who are. They choose a completely different color palette for every single room of their house. The kitchen is red and yellow, the living blue and green, the bathroom orange and purple... Ok, that's a bit extreme, but you see my point. If you pick a semi-neutral palette of colors (I usually go with a set of 3-4) and use them throughout your home (particularly in spaces you frequent: living, dining, kitchen), your home will feel much more cohesive. Then, for example, in the living/dining area, pick a new color (or two) to pop with your accessories (like adobe orange). This not only makes it easier to change color palettes (recover your pillows and buy a new rug when you tire of orange), but it also showcases the color much better. A perfect example can be found at Just a Girl blog. See how that orange stands out, yet could be swapped out easily for, say, blue??

3. Use a Color-Picker App. Did you know these exist?? I didn't either until recently. Home Depot has a fabulous one called "Project color". You take a picture of your room (or there is also a "live" mode). Then you can pick a color by shade, tone, etc. The technology easily finds the edges of the things you have on and against the walls and "paints" around them, basically allowing you to digitally paint your room as many times as it takes to find the perfect shade. That's right, folks. No need to buy two million paint samples. Narrow it down to a just a few using this handy app first!

4. Time of Day Matters. Once you start considering your color palette, pay attention to how the light changes in the room. Check out how the ambient light of your lamps effect the color. Check out how morning light looks different than afternoon and evening. I usually like to have my sample color up for at least a day or two on MULTIPLE WALLS before I commit to a whole room. Why multiple walls? Because the shading of light won't be the same on different walls due to the light from windows, etc. When I'm testing a color, I paint little patches everywhere. High, low, corners, east, west...

5. Neatness Counts. Nothing ruins a freshly painted wall faster than a messy application. Be neat and clean. Take your time and make sure you are coating the surface. Do another coat if you have to. Be sure to use the right roller for the wall surface you are painting on and use "W-Shaped" strokes with the roller. I love using paint/primer's-in-one for painting pretty much anything other than an already-white surface. It's usually worth it. Also, I rarely ever use painter's tape anymore (only occasionally and for special projects). Try using a Shur Line painting edger. It is soooo much faster!


6. Clean-Up. With a two-year-old, I can rarely finish any painting project in just one day. I always keep 2 gallon ZipLock bags on hand. When I need to break, I put everything (roller, Shur line, paint brush) into the bag with a wet paper towel and stick it in the fridge. When I'm ready to use it again, I just pull them out and they are ready to go. I have kept painting materials fresh this way for months in the past.

7. Check out Pinterest. There are a BUNCH of ideas for simplifying the painting process, and making things cleaner and easier. (Like plastic bagging your roller tray so you can just throw the bag away but reuse the tray...GENIUS). There are also a million color palette ideas and samples. People that have already used your color palette in a room, so you can get a better feel for the look you're going for BEFORE you commit a bunch of time, money, and energy into changing your walls. It's definitely worth a browse.

So that about wraps it up. I can't go, however, without sharing with you my all-time favorite wall-color: Valspar Sandstone. I have painted nearly every wall in both my previous and current house with this color. I've had a few family member's use this color as well. It's almost fool-proof because it goes with just about everything. And **Bonus** because I use it so often and in such massive quantities, I buy it by the 3 gallon bucket and get a discount! It's warm, but still contemporary. Love it.
Before
During


After


Friday, August 7, 2015

Sliding Barn Door: Office Transformation (Part 2)

Life has gotten a little crazy around here. The photography business has picked up a bit, so rather than writing blog posts, I have been parked at the computer, editing endless photo's. Nevertheless, here is our barn door we added to our office a few months ago:

Love the nice, large statement it makes when you walk in.


It was made almost completely from scratch. We had a really odd-sized door, because the ceilings are high, and the opening wide. The door is HEAVY. We purchased the metal rollers from Ebay, and crafted the rail from metal stripping purchased from the hardware store.


 It took two coats of stain- one the lighter color, the second the dark.


Here is the finished product!

Thursday, June 11, 2015

30 B4 30: Water Challenge and Clean Eating Challenge Results!

As part of my 30 b4 30 list, which you can see here, I decided to do a water challenge and a clean eating challenge. I decided to do both at the same time, each for 30 days.

Water...goooood....soda....bad.....For the water challenge, I simply cut all liquids other than water from my diet. No soda, juice, etc. It was ridiculously hard for me, because I am one of the worst soda-addicts EVER. As in, I have gone days where I only drank soda...nothing else. The first few days I had a killer headache, but after that, the cravings were pretty minimal. I learned to be ok with water. I even learned to like it for the most part. Since the end of the challenge, I have been able to limit soda intake to a much more reasonable, 1-soda-per-day limit. I still drink mostly water.

So with the clean eating challenge, I followed this menu for the first few weeks, then built my own after that. I cut out processed foods almost completely. Absolutely no high fructose corn syrup or weird preservatives. If I couldn't read it or didn't know what it was, I didn't eat it. I monitored calorie intake using an online tracker to ensure that I didn't go way over on food intake, since I'm not used to eating this way. I will say, this was a very difficult challenge. Not because it's hard to find food that fits the criteria, but because it's very difficult to maintain weight while eating full-fat, non-processed foods. It was almost impossible to lose weight with this strategy. I felt great while doing it, but was almost always hungry. Let's just say I was glad when the 30 days was up!

Side Note- The beauty of the clean eating challenge was that I got to try some awesome new recipes...I found some new family favorites and tried several things I have never had before!

The Results- I lost 7 pounds total. I probably lost a few inches as well. Here's a before and after:

Tuesday, May 26, 2015

Concrete Desk and Pipe Shelves: Office Transformation (Part 1)


For part one of the three-part Office Transformation series, I give you, our Concrete Desk and Pipe Shelves. With nods to both vintage and industrialist modern styles, this wall make's a statement in our new office, and I'm loving what it's saying...

The Concrete Desk- 
We purchased the legs unfinished from Lowe's, and the hubby built the reinforcement. I stained it all using Rust-oleum stain that my SIL put me on to (See her DIY Crate Coffee Table Here). I
used a combo of the American Walnut and the Kona color's. The hubby then build a form to pour the concrete into using laminated board (this board works soooo much better than anything else because it doesn't absorb the water from the concrete mixture). Once dry, the concrete will need to be sealed with a concrete sealer (we didn't do any sanding on ours because we liked the look as-is). Andrew bolted the wood part of the desk to the wall, then we had to get some serious assistance carrying in the piece of concrete for the top (for real, this thing is HEAVY). We put down some blobs of glue and set it into place, and voila! A desk!


Pipe Shelves-
I saw these all over Pinterest, and I just had to have them. Andrew and I debated the placement, size and location of them, but we knew we wanted them for our office. I love how they turned out, and they were relatively easy to make and install. We went to the home improvement store and purchased the pipe fixtures from the plumbing section. They were the perfect size, so no cutting was needed. We then purchased the board and cut it into three varying lengths. I wanted something that looked "reclaimed" so we looked for the gnarliest piece of lumber we could find.
Once cut, I stained them with the same stain I used for the legs of the desk, starting first with the American Walnut, then lightly coating with the Kona. Once dry, we just set the wood on the pipes and filled them with our treasures. They are very sturdy since the pipe caps help keep them wedged into place.


Pulley Light-
The hubby added this at the last minute. We purchased the pendant light for about $20, and the basket shade for another $10. Then, we added a pulley and hook. It plugs into the outlet like a lamp, and I just love the vintage, Edison bulb!


Stay tuned for Part 2 of the Office Transformation- The Sliding Barn Door! -Cassie

Friday, May 1, 2015

30 Before 30 Challenge

My birthday was at the beginning of April, and I'm feeling a little old. Not like, need-a-walker kind of old, but I just feel like life is passing so quickly these days! There is so much I still want to do and accomplish. So I made a list. 30 things to accomplish on my bucket list before I turn 30 (April of 2017). Some of them are big, some small, but hopefully all things I can accomplish before the big 3-0. In the mean time, I hope to share with you my adventures as I accomplish these tasks!

Here's the big 30b430 list: (To follow my 30b430 list on Pinterest, click here: https://www.pinterest.com/cduffle/30-b4-30/
  1. Go to Greece- Specifically, I want to see Santorini, an island off of the Greece mainland. I hope to do this for my 30th birthday.
  2. Christmas in NYC- I actually already have this one booked.  I booked it right after I completed my list. We are going this December. :-)
  3. OKC 1/2 Marathon- I've already started a couch-to-5k running schedule. I can't imagine running long enough to complete a 5k, never mind a 1/2 marathon...but, baby steps!
  4. Smile Challenge- I'm going to make an active effort to smile for 30 seconds a day for 30 days. If you see me grinning for no reason, you'll now know why...
  5. Take a French Class- I don't know an ounce of French. I'd like to at least be able to order off a menu.
  6. Take A Photography Class- I have never taken a proper class, and would love to learn a little more about my hobby.
  7. Climb a Mountain- It doesn't have to be a big one, but I do want to make it to the top and feel like I'm on top of the world ;-)
  8. Learn to Bartend- Not like every drink in the book, but a nice set of 20 or so should do the trick.
  9. Skinny Dipping- I've never done it, but hey, you should do dumb stuff in your 20's, right??
  10. Karaoke- Writing this strikes fear in my heart. I am terrified to sing in front of people, but feel the need to concur a fear.
  11. Drink More Water- I'm doing a 30 day water challenge, and planning to cut soda entirely for 30 days. If you know me, then you know that I'm an EPIC soda drinker, so this challenge should be interesting...
  12. Learn Yoga- I'm planning to do a 30 day Yoga challenge. Hopefully I'll find my zen...but if not, maybe I'll at least be a bit more flexible...
  13. Read a Classic- Ok, confession, I didn't really read much in high school or college, unless you count cliff's notes. I enjoy reading now, but didn't back then. I should read at least one of the classics, don't you think? Suggestions? Suggestions?
  14. Try a New Food- I love to try new foods. I've never tried Thai, so I may shoot for that. If not, I may do something really gross and exotic. We will see if an opportunity presents itself.
  15. Complain Less- I'm doing a 3 day challenge. I'm a notorious complainer, so hopefully this helps!
  16. Save Money- I'm just bad at saving money. I'm doing a 52 week money-saving challenge. Hopefully our savings will help pay for that Greece trip ;-)
  17. Stay Calm- If you have kids, you have probably realized that sometimes it's just hard to stay calm and not yell. Or, at least it is for me. I'm doing a 21 day's to no yelling challenge.
  18. Road Trip with the Girls- I'm keeping my fingers crossed that I can convince my buddies to do this one with me this summer!
  19. Color Run- A 5K to help gear up for a 1/2 marathon, but more importantly, doesn't it look insanely fun??
  20. Build a Gingerbread House- This will be a fun Christmas activity for this next holiday season. I want to build a real one...no kits!
  21. Family Picnic- I want to do a quintessential picnic. With a basket and a blanket on a beautiful spring/summer day under a tree!
  22. Create a Scrapbook- As crafty as I am, this one will be difficult. It's been a looong time since I made a scrapbook, and I'm not sure they really even qualified as scrapbook (they were really just photo albums). I want to do a baby book for Z oooorrr a travel book...I can't decide which.
  23. Indoor Rock Climbing- A friend suggested this one, and it sounded fun. I've never been, so why not?
  24. Have a Tech-Free Day- No technology for a day? Impossible. I will use electricity, gas, and water. I'll drive my car and probably listen to the radio. Outside of that, no phone, facebook, email, tv, computer..nothing with a screen.
  25. Random Act of Kindness- Hopefully I can come up with a nice, low-cost way to pay-it-forward. At least once.
  26. Glitter Photo Shoot- I want a mommy-daughter photo shoot with glitter. I haven't worked out the details, but it sounds fun!
  27. Polar Bear Plunge- Again, stupid things in your 20's.... Hopefully I can find one with an associated good-cause, thus slightly relieving my feeling of stupidity. 
  28. Learn to Cook- I don't want to actually take a cooking class, but I would like to learn 10 new really good recipes! Hopefully I'll find some new go-to's.
  29. Take a Photo a Day- There's a great photo-a-day challenge on Pinterest. It lasts for 30 days, and should be a fun project and a great learning experience. 
  30. Eat Better- This is such a broad term, but I've been soooo off-track with my eating habits lately. I plan to try a 30 day clean-eating challenge I found on Pinterest. 
There you have it! 30 item's to complete in almost 2 years! This should make for some fun adventures and memories! <3